
작성자는 쉐퍼드23의 Product Manager & Software Engineer로 재직하며 카페24 플랫폼을 대상으로 하는 Contextual Bandit 기반의 개인화 상품 추천 플러그인 PickHound의 개발 부문을 담당한 바가 있습니다. (See: 경력 기술서 - PickHound)
작성자는 플러그인 개발의 일환으로, StencilJS를 이용해 카페24 쇼핑몰 위에 표시되는 상품 추천 팝업 배너를 개발하였고, 팝업 배너의 디자인을 수정할 수 있는 디자인 에디터를 React CSR 애플리케이션으로 구현한 쇼핑몰 관리자용 어드민 대시보드를 개발하였습니다.
이번 글에서는 이 중 배너 디자인 수정 페이지를 개발하며 겪었던 상태 관리에 대한 고민과 이를 해결하기 위해 시도했던 방법들에 대해 소개하고자 합니다.
Why StencilJS?
카페24 쇼핑몰에 삽입되어 기존 쇼핑몰 위에 표시되는 상품 추천 팝업 배너는 StencilJS로 개발되었습니다.
카페24에 입점한 쇼핑몰은 플랫폼 내부의 플러그인 스토어를 통해 여러 플러그인을 설치해 쇼핑몰에 적용할 수 있습니다. 이에 비즈니스 로직이 실행되려면 이에 앞서 스크립트가 다운로드 되어야 했고, 작성한 스크립트가 빠르게 실행되어 의도한 비즈니스 로직이 지연으로 인해 상품 추천을 하기도 전에 유저가 다른 페이지로 이동해버리는 등 원하는 결과를 얻지 못하는 상황을 방지하기 위해 작은 번들 사이즈가 필수적이였습니다.
이러한 상황에서 작성자는 StencilJS를 도입했습니다. React를 사용했을 때보다 번들 사이즈도 줄어들 것이고, 실행 시간도 Virtual DOM을 사용하는 React보다 브라우저의 Native Support가 있는 web-component를 기반으로 작동하는 StencilJS가 이 상황에서 이상적인 선택이라고 생각했습니다.
그리고 결과적으로 이러한 선택을 통해 기능이 동일한 타사 추천 플러그인에 비해 본 팀의 스크립트 번들 사이즈를 60% 줄이는 등의 성능적인 측면에서의 성과가 있었습니다.
작업의 경과
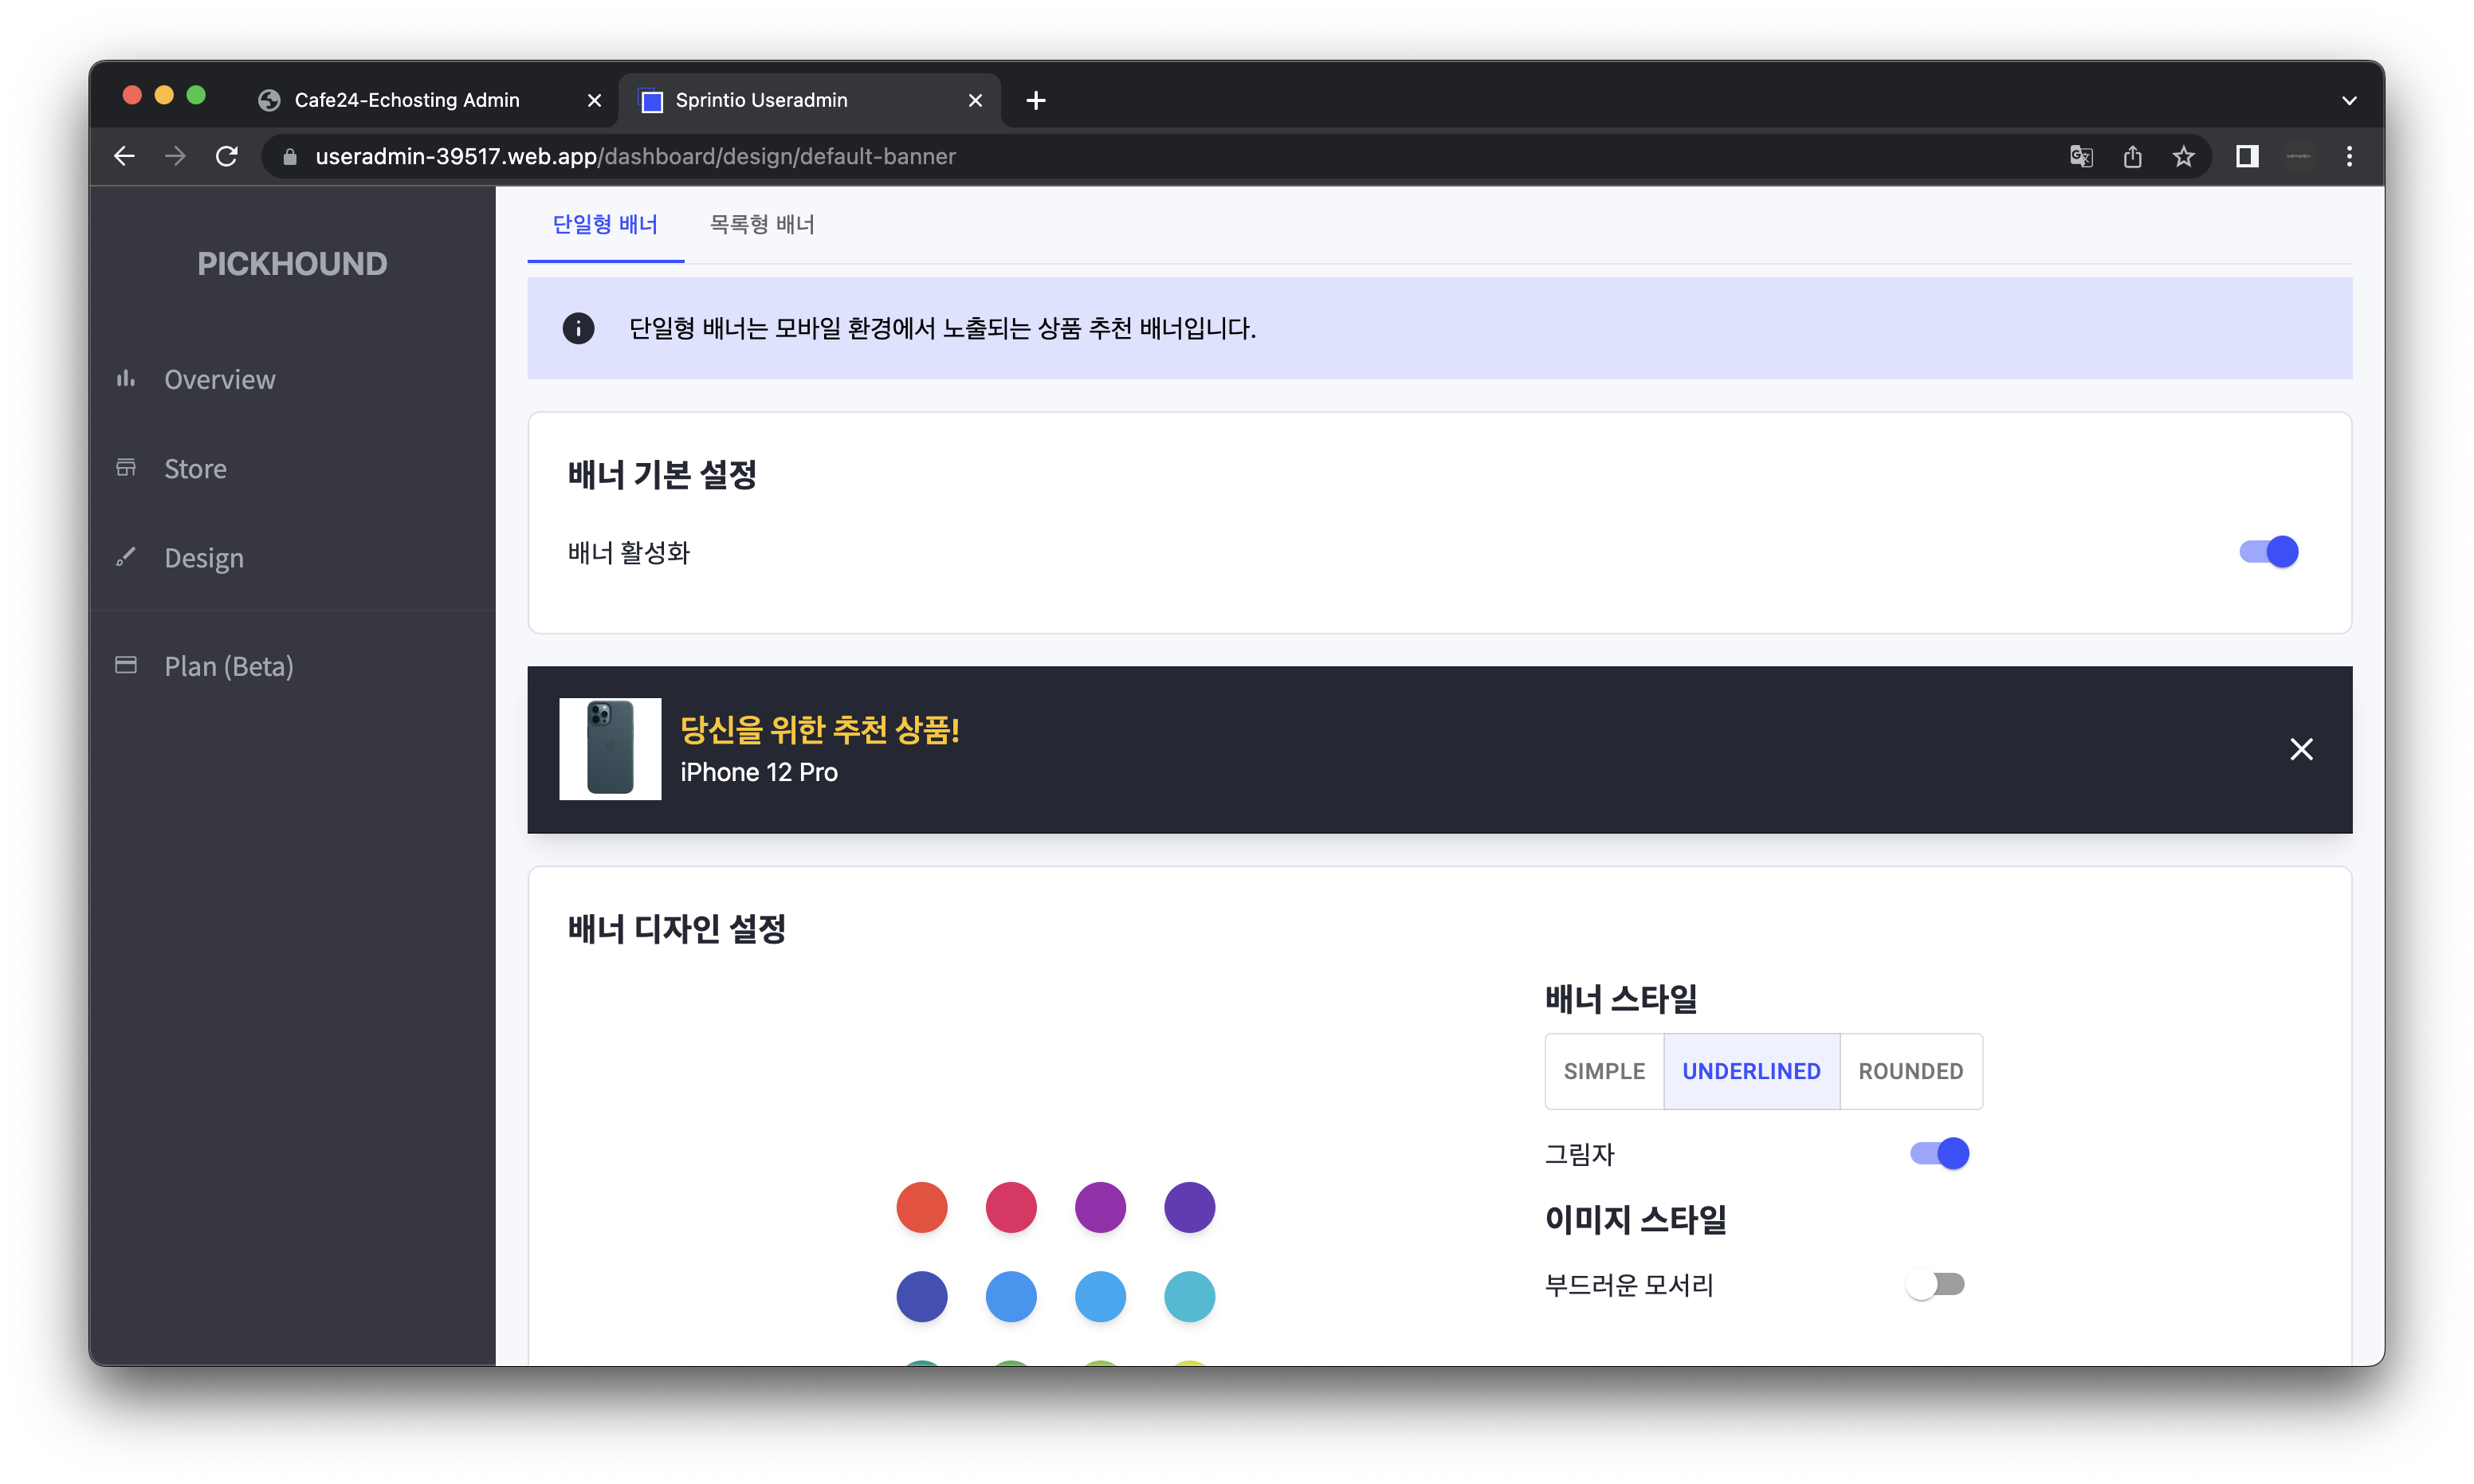
배너 디자인 페이지는 위 사진에서 보이는 “배너 디자인 설정” 카드에서 배너의 색깔, 스타일, 그림자 유무 등의 디자인을 설정하도록 개발하였는데, 어떤 옵션을 변경할 때마다 배너에 변경한 옵션이 적용되도록 개발하고자 하였습니다.
여기서 어려웠던 점은, 배너는 StencilJS, 대시보드는 React CSR 애플리케이션으로 개발하는 상황에서 배너의 디자인 정보를 Web Component에 안정적으로 반영하는 것이었습니다.
처음에는 이를 전부 Redux에 기반한 FLUX 패턴으로 해결하고자 하였습니다. @reduxjs/toolkit의 createSlice API를 이용해 DesignSlice를 만들어 모든 디자인 정보를 관리하고, view에서 배너의 디자인 정보를 변경할 때마다 dispatch��를 통해 action이 DesignSlice로 흘러 들어가 store의 상태를 업데이트하고, 이것이 다시 view에 반영되도록 하였습니다.
그러나 변경 가능한 디자인 옵션이 여러가지인 상황에서 모든 코드를 DesignSlice에 몰아넣는 것은 좋은 방법이 아니라고 생각했습니다.
또한 React의 상태와 StencilJS로 빌드된 Web Component의 상태를 한 곳에서 같은 방식으로 관리하는 것도 좋은 방법이 아니라고 생각했습니다.
이에 작성자는 React 단의 디자인 에디터는 @reduxjs/toolkit을 활용한 FLUX 패턴으로, 추천 배너 Web Component는 Banner Manager 객체가 Controller, style 오브젝트가 Model, DesignSlice가 View 역할을 하는 MVC 패턴으로 상태 관리를 구현하고자 하였습니다. 이 방향이 React 단은 React에 적합한 코드 스타일로, StencilJS로 빌드한 Web Component 단은 Web Component 에 적합한 코드 스타일로 상태를 관리할 수 있을 것이라고 생각했기 때문입니다.
Banner Manager
먼저 StencilJS로 빌드한 Web Component의 style을 관리하는 별도의 객체를 작성해 DesignSlice는 React 단의 상태만 관리하게끔 만들고자 하였습니다.
Banner Manager 구현 예시: DefaultBannerManager
아래는 PickHound에서 제공하는 2가지 종류의 상품 추천 배너 중 모바일 쇼핑몰에 적용되는 배너의 디자인을 관리하는 DefaultBannerManager의 구현 예시입니다.
class DefaultBannerManager {
  // ==============================
  // Class properties...
  // ==============================
  private _id?: string;

  private _interactive?: boolean;

  private renderRoot?: HTMLElement;

  /** @description Banner's ID */
  private get id(): string {
    if (!this._id) throw new Error("Id not initialized");
    return this._id;
  }

  /** @description Indicates if the banner is attached to {@link renderRoot} */
  public get initialized(): boolean {
    return !!this._id && !!this.getInstance();
  }

  /** @description Indicates if manipulating the style is allowed */
  public get interactive(): boolean {
    return this.initialized && !!this._interactive;
  }

  public get instance(): HTMLDefaultBannerElement {
    const banner = this.getInstance();
    if (!banner) throw new Error("Banner not created or attached to the DOM");
    return banner;
  }

  // ==============================
  // Style properties...
  // ==============================

  public get style(): DefaultBannerStyle {
    return this.instance.dataStyle;
  }

  public get title(): string {
    if (!this.style?.title) throw new Error("Title not found");
    return this.style?.title;
  }

  // ==============================
  // More style property getters...
  // ==============================

  // ==============================
  // Class methods...
  // ==============================

  private render(bannerStyle: DefaultBannerStyle) {
    if (!this.renderRoot) throw new Error("Render root not initialized");
    this.renderRoot.querySelector(`#${this.id}`)?.remove();
    const banner = document.createElement(BannerType.default);
    banner.id = this.id;
    banner.editable = true;
    banner.dataProduct = bannerDummyData.at(0)!;
    banner.dataStyle = structuredClone(bannerStyle);
    this.renderRoot.appendChild(banner);
  }

  private rerender(bannerStyle: DefaultBannerStyle) {
    if (!this.renderRoot) throw new Error("Render root not initialized");
    const banner = this.getInstance();
    if (!banner) throw new Error("Banner not created or attached to the DOM");
    banner.dataStyle = structuredClone(bannerStyle);
  }

  public initialize(
    id: string,
    bannerStyle: DefaultBannerStyle,
    renderRoot: HTMLElement,
  ): HTMLDefaultBannerElement {
    // If already initialized, return the instance
    if (this.initialized) return this.instance;

    // Set render root and id
    this.renderRoot = renderRoot;
    this._id = id;

    // Register Custom Web Component if not registered
    if (!customElements.get(BannerType.default)) {
      defineCustomElementDefaultBanner();
    }

    // Render banner
    this.render(bannerStyle);

    // Return the instance
    return this.instance;
  }

  public markAsInteractive(): void {
    this._interactive = true;
  }

  private getInstance() {
    const banner = document.getElementById(this.id) as HTMLDefaultBannerElement;
    if (!banner) return null;
    return banner;
  }

  // ==============================
  // Style updaters...
  // ==============================

  private updateStyle(newStyle: DefaultBannerStyle) {
    if (!this.interactive)
      throw new Error("Can't update style when not interactive");
    this.rerender(newStyle);
  }

  public setTitle(title: string): void {
    const banner = this.instance;
    this.updateStyle({
      ...banner.dataStyle,
      title,
    });
  }

  // ==============================
  // More style property updaters...
  // ==============================
}
위의 DefaultBannerManager의 예시에서는 initialize 메서드를 통해 배너를 생성 및 최초 렌더링하고, markAsInteractive 메서드를 통해 배너의 디자인을 변경할 수 있도록 허용합니다.
또한 setTitle 등의 스타일 변경 메서드는 updateStyle 메서드를 호출하고, 이는 rerender 메서드를 호출하여 Web Component 배너의 스타일을 업데이트 합니다.
structuredClone을 이용한 새로운 객체 참조 생성
스타일을 업데이트 할때는 structuredClone 빌트인 함수를 이용해 새로운 객체 참조를 생성하게끔 하였습니다. 이는 StencilJS를 통해 Build된 Web Component의 프로퍼티는 Shallow Compare를 통해 변경 여부를 판단하기 때문에, 객체 참조가 변경되지 않으면 변경된 스타일이 반영되지 않는 문제를 해결하기 위함입니다. (See: https://stenciljs.com/docs/properties#mutable-arrays-and-objects)
Design Slice
위와 같이 구현한 Banner Manager 를 이용해 배너의 디자인을 변경하고자 할 때, Design Slice의 상태를 업데이트하고, 이를 통해 React 단의 상태를 업데이트하고자 하였습니다.
Design Slice 구현 예시: DefaultBannerDesignSlice
아래는 PickHound에서 제공하는 2가지 종류의 상품 추천 배너 중 모바일 쇼핑몰에 적용되는 배너에 대한 상태를 관리하는 DefaultBannerDesignSlice의 구현 예시입니다.
interface State {
  // Banner instance
  banner: DefaultBannerManager;

  // Banner styles
  title: string;
  disabled: boolean;
  color: [string, string];
  // ==============================
  // More style properties...
  // ==============================
}

const initialState: State = {
  banner: new DefaultBannerManager(),
  title: "",
  disabled: false,
  color: undefined,
  // ==============================
  // More style properties...
  // ==============================
};

export const DefaultBannerDesignSlice = createSlice({
  name: "default-banner-design",
  initialState,
  reducers: {
    setTitle: (state, action: PayloadAction<State["title"]>) => {
      // Update state for react component
      const title = action.payload;
      state.title = title;

      // Update banner state for stenciljs web component
      const banner = state.banner;
      if (banner.interactive && title.length !== 0) {
        banner.setTitle(title);
      }
    },
    setColor: (state, action: PayloadAction<State["color"]>) => {
      // Update state for react component
      const color = action.payload;
      state.color = color;

      // Update banner state for stenciljs web component
      const banner = state.banner;
      if (banner.interactive && !!color) {
        banner.updateColorTween(color);
      }
    },
    // ==============================
    // More style updating reducers...
    // ==============================
  },
});

export const {
  // Action creators
} = DefaultBannerDesignSlice.actions;

export default DefaultBannerDesignSlice.reducer;
DefaultBannerDesignSlice의 Action Creator를 통해 상태를 업데이트하면, 먼저 React 단의 상태를 업데이트하고, 만약 배너가 interactive 상태라면 DefaultBannerManager를 통해 배너의 스타일을 업데이트합니다.
Banner Design Editor
위와 같이 구현한 Banner Manager 와 Design Slice 를 활용하여 최종적으로 배너의 디자인을 변경할 수 있는 디자인 에디터를 개발하였습니다.
Banner Design Editor 구현 예시: DefaultBannerDesignEditor
아래는 PickHound에서 제공하는 2가지 종류의 상품 추천 배너 중 모바일 쇼핑몰에 적용되는 배너의 디자인을 수정할 수 있는 DefaultBannerDesignEditor의 구현 예시입니다.
const DefaultBannerDesignEditor: React.FC = () => {
  const metadata = useMetadata();
  const {
    data,
    error,
    isError,
    isLoading: mallDataLoading,
  } = useGetMallQuery(metadata ?? skipToken); // Provided by RTK Query

  const { updateBannerDesign, isLoading: updateBannerLoading } =
    useUpdateBannerDesign(); // Provided by RTK Query

  useErrorHandle(isError, error, true);

  const bannerStyle =
    data?.bannerStyle?.defaultBanner ??
    (isUIOnly() ? defaultBannerDefaultStyle : undefined);

  const design = useAppSelector((store) => store.design.defaultBannerDesign);
  const banner = design.banner;

  const dispatch = useAppDispatch();

  // Initial Banner Render
  useEffect(() => {
    // If banner style is not loaded, return
    if (!bannerStyle) return;

    // Get pre-defined render root
    const renderRoot = document.getElementById(BANNER_RENDER_ROOT_ID);

    // If render root is not found, return
    if (!renderRoot) return;

    // Initialize banner with banner style from the server
    banner.initialize(BANNER_ID, bannerStyle, renderRoot);

    // Reflect banner style to the design slice's state
    dispatch(setTitle(banner.title));
    dispatch(setDisabled(banner.disabled));
    dispatch(setColor(banner.colorTween));
    dispatch(setBannerStyleType(banner.bannerStyleType));
    dispatch(setShadow(banner.shadow));
    dispatch(setImageRounded(banner.imageRounded));

    // Mark banner as interactive
    banner.markAsInteractive();
  }, [!!bannerStyle]);

  const onColorChange = (newColor: Maybe<ColorKeys>, newHex: string | null) => {
    /* Event handler for color picker state change */
  };

  const onDisableChange = async (newDisabled: boolean) => {
    /* Event handler for disable toggle state change */
  };

  return (
    <Container className="my-2" fill>
      {/* ... JSX content */}
    </Container>
  );
};

export default DefaultBannerDesignEditor;
배너 초기 렌더링 로직
DefaultBannerDesignEditor 컴포넌트는 아래와 같은 로직으로 배너를 초기 렌더링합니다.
// Initial Banner Render
useEffect(() => {
  // If banner style is not loaded, return
  if (!bannerStyle) return;

  // Get pre-defined render root
  const renderRoot = document.getElementById(BANNER_RENDER_ROOT_ID);

  // If render root is not found, return
  if (!renderRoot) return;

  // Initialize banner with banner style from the server
  banner.initialize(BANNER_ID, bannerStyle, renderRoot);

  // Reflect banner style to the design slice's state
  dispatch(setTitle(banner.title));
  dispatch(setDisabled(banner.disabled));
  dispatch(setColor(banner.colorTween));
  dispatch(setBannerStyleType(banner.bannerStyleType));
  dispatch(setShadow(banner.shadow));
  dispatch(setImageRounded(banner.imageRounded));

  // Mark banner as interactive
  banner.markAsInteractive();
}, [!!bannerStyle]);
위의 useEffect의 callback의 맨 마지막 줄인 banner.markAsInteractive()는 Banner Manager를 interactive 상태로 만듭니다. 이는 Design Slice의 상태를 업데이트할 때, Banner Manager를 통해 배너의 스타일도 같이 업데이트할 수 있도록 합니다.
여기서 초기에 배너를 렌더링할 때 interactive를 false로 두는 이유는, 초기에는 서버에서 받아온 배너의 스타일을 적용하고 이를 React State로 옮기기 위함입니다.
Banner Manager는 배너의 스타일을 정의하는 복잡한 객체에서 Design Slice에 상태로서 flat하게 정의되어 있는 프로퍼티와 같은 이름의 그것으로 제공하는 Getter가 구현되어 있습니다. (See: Banner Manager)
이는 서버에서 받아온 스타일을 banner.initialize()를 통해 적용한 뒤, 이를 Design Slice의 상태로 옮길 적에 활용할 수 있는 편리한 방안이었습니다.
그러나 Design Slice reducer 에 정의된 바 같이 Design Slice의 Action Creator는 React의 상태와 StencilJS로 빌드된 Web Component의 상태를 같이 관리하기 때문에, Design Slice의 상태를 업데이트할 때마다 Banner Manager를 통해 배너의 스타일도 같이 업데이트하게 됩니다.
이때 이미 적용된 스타일을 다시 하나하나씩 적용해 업데이트 하면, 배너의 스타일 객체를 계속적으로 병합하는 과정에서 예상치 못한 방향으로 불�안정하게 스타일이 업데이트되는 문제점이 있었습니다.
이에 Banner Manager에 interactive라는 상태를 추가하고 이를 false로 두어, 초기에는 Design Slice의 상태를 업데이트할 때 Banner Manager를 통해 배너의 스타일을 업데이트하지 않도록 하였고, 모든 초기 셋업 작업이 끝나면 interactive를 true로 변경하여 배너의 스타일을 업데이트할 수 있도록 하였습니다.
작업의 결론 및 의의
위와 같은 일련의 작업들을 통해서 배너의 디자인을 수정할 수 있는 디자인 에디터를 개발하였습니다.
위에서 언급한 것처럼 디자인 에디터는 위 사진의 "배너 디자인 설정" 카드에서 배너의 색깔, 스타일, 그림자 유무 등의 디자인을 설정할 수 있고, 어떤 옵션을 변경할 때마다 배너에 변경한 옵션이 바로 적용되어 사용자가 시각적으로 확인할 수 있도록 구현하였습니다.
개발하고자 하는 기능이 다소 복잡했지만, OOP와 모듈화에 대한 계속적인 고민을 통해 간결하고 직관적이며 유지보수에 용이한 상태 관리 코드 작성할 수 있었습니다. 이러한 클린 코드 작성을 통해 작성자는 플러그인을 사용하는 쇼핑몰 관리자가 요청한 화면에서의 배너의 위치 변경 기능을 하루 만에 구현, 테스트 및 배포할 수 있었습니다.
또한 작업을 진행하면서 FLUX, MVP 등 코드 패턴에 관한 깊은 고찰과 Javascript, React, Redux, Web Component 의 동작 원리에 대한 이해를 크게 높일 수 있었고, 특히 MVP, FLUX 등의 추상적인 디자인 패턴에 대한 구체적인 이해를 얻고 이를 유연하게 코드에 적용하는 법을 배울 수 있었습니다.